
Others
A Beginner’s Guide to Vue Router
Here’s a great article from SitePoint
In this tutorial, we’ll be looking at how we can implement routing in a Vue app using Vue Router. So we can have a hands-on practice, we’ll be building a simple Pokedex app using Vue and Vue Router.
Specifically, we’ll be covering the following:
- setting up a router
- route parameters
- declarative and programmatic navigation
- nested routes
- 404 pages
Every JavaScript UI framework that allows the creation of single page applications needs a way to navigate users from one page to another. All of this needs to be managed on the client-side by syncing the view that’s currently displayed on the page with the URL in the address bar. In the Vue world, the [official library] for managing this type of task is Vue Router.
As ever, the code for this tutorial can be found on GitHub.
Prerequisites
The following are required so you can make the best use of this tutorial:
- Basic knowledge of HTML, CSS, JavaScript, and Vue. If you know how to render something on the page using Vue, you should be able to follow along. A little knowledge on APIs would also help.
- Node.js and Vue CLI installed on your machine. We’ll be using Vue 3 in this tutorial so make sure Vue CLI is updated.
App Overview
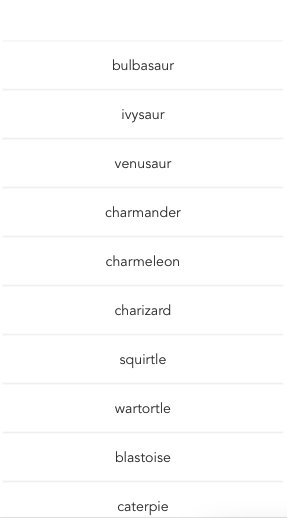
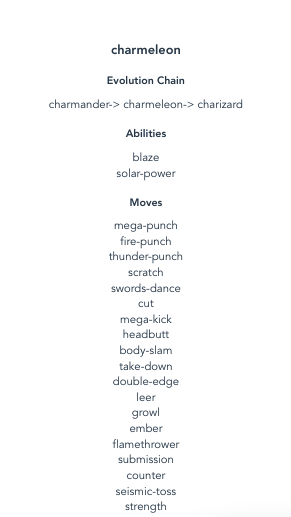
We’re going to build a Pokedex app. It will have three pages:
-
Pokemon list page. This is the default page which lists all the original 151 Pokemon.

-
Pokemon page. This is where we display the basic details such as type and the description.

-
Pokemon details page. This is where we display the evolution chain, abilities and moves.


Setting Up the App
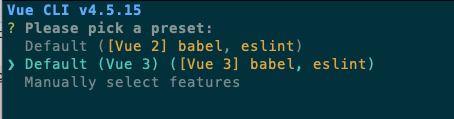
Spin up a new Vue app using the Vue CLI:
vue create poke-vue-router
Choose Vue 3 from the options listed:
Once it’s done, navigate inside the project folder and install the libraries we need:
cd poke-vue-router
npm install vue-router@4 axios
Note that we’re using Vue Router 4 instead of 3, which is the default result that shows up when you Google it. It’s at next.router.vuejs.org as opposed to router.vuejs.org. We’re using Axios to make a request to PokeAPI v2.
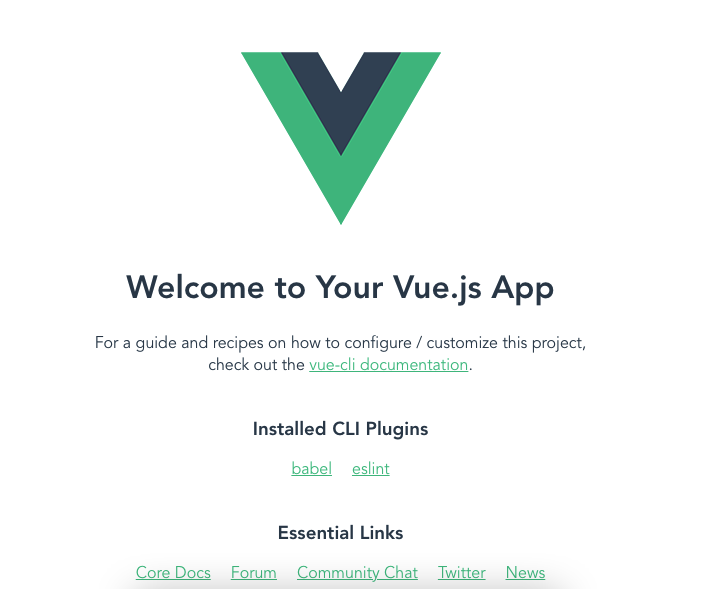
At this point, it’s a good idea to run the project to make sure the default Vue app is working:
npm run serve
Visit http://localhost:8080/ on your browser and check to see if the default Vue app is running. It should show something like this:
Next, you need to add sass-loader as a dev dependency. For the purpose of this tutorial, it’s best to just install the same version I used. This is because, at the time of writing, the latest version isn’t compatible with Vue 3:
npm install [email protected] --save-dev
You also need to install node-sass, for the same reason as above. It’s best to stick with the same version as mine:
npm install [email protected] --save
Note: if installing Sass this way doesn’t work for you, you can also choose Manually select features when creating the Vue app with the CLI. Then, select CSS Preprocessors and pick Sass/SCSS (with dart-sass).
Creating the App
Now we’re ready to start building the app. As you follow along, remember that the root directory is the src folder.
Start by updating the main.js file. This is where we import the root component App.vue and the router/index.js file where we declare all things related to routing:
// main.js

import { createApp } from "vue";
import App from "./App.vue";
import router from "./router";

const app = createApp(App);
app.use(router);
app.mount("#app");
Setting up a router
In the App.vue file, use the router-view component provided by Vue Router. This is the top-most component used by Vue Router that renders the corresponding component for the current path visited by the user:
// App.vue
<template>
  <div id="app">
    <router-view />
  </div>
</template>

<script>
export default {
  name: "App",
};
</script>
Next, create a new router/index.js file and add the following. To create a router, we need to extract createRouter and createWebHistory from Vue Router. createRouter allows us to create a new router instance, while createWebHistory creates an HTML5 history that’s basically a wrapper for the History API. It allows Vue Router to manipulate the address in the address bar when we’re navigating between pages:
// router/index.js
import { createRouter, createWebHistory } from "vue-router";
Below that, import all the pages we’ll be using:
import PokemonList from "../views/PokemonList.vue";
Vue Router requires an array of objects containing the path, name, and component as its properties:
path: this is the pattern you’d like to match. In the code below, we’re matching for the root path. So if the user tries to accesshttp://localhost:8000, this pattern is matched.name: the name of the page. This is the unique identifier for the page and is what’s being used when you want to navigate to this page from other pages.component: the component you want to render when thepathmatches the URL the user accessed.
const routes = [
  {
    path: "/",
    name: "PokemonList",
    component: PokemonList,
  },
];
Finally, create the router instance by supplying an object containing the history and the routes to createRouter:
const router = createRouter({
  history: createWebHistory(),
  routes,
});

export default router;
That’s all we need for now. You might be wondering where the other pages are. We’ll add them later as we go along. For now, let’s work on the default page first.
Creating a page
Creating a page doesn’t really need any special code. So if you know how to create a custom component in Vue, you should be able to create a page for Vue Router to use.
Create a views/PokemonList.vue file and add the code below. In this file, we’re using a custom List component to render the Pokemon list. The only thing we really need to do is to supply the data for the List component to use. We make a request to PokeAPI once the component is mounted. We don’t want the list to get too big, so we’re limiting the results to the original 151 Pokemon. Once we get the results back, we simply assign it to the component’s items data. This will in turn update the List component:
<template>
  <List :items="items" />
</template>

<script>
import axios from "axios";
import List from "../components/List.vue";

export default {
  name: "PokemonList",
  data() {
    return {
      items: null,
    };
  },
  mounted() {
    axios.get(`https://pokeapi.co/api/v2/pokemon?limit=151`).then((res) => {
      if (res.data && res.data.results) {
        this.items = res.data.results;
      }
    });
  },
  components: {
    List,
  },
};
</script>
Here’s the code for the List component. Components are stored in the components directory, so create a components/List.vue file and add the following:
<template>
  <div v-if="items">
    <router-link
      :to="{ name: 'Pokemon', params: { name: row.name } }"
      class="link"
      v-for="row in items"
      :key="row.name"
    >
      <div class="list-item">
        {{ row.name }}
      </div>
    </router-link>
  </div>
</template>

<script>
export default {
  name: "List",
  props: {
    items: {
      type: Array,
    },
  },
};
</script>

<style lang="scss" scoped>
@import "../styles/list.scss";
</style>
You can check out the code for the styles/list.scss file in the GitHub repo.
At this point, you can now view the changes in the browser. Except you get the following error instead:
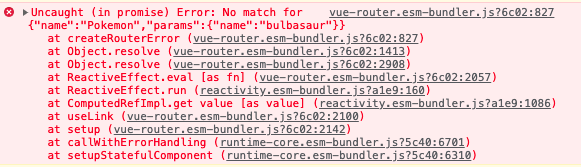
This is because Vue is trying to generate the link to the Pokemon page but there isn’t one yet. The Vue CLI is smart enough to warn you of that. You can temporarily solve this issue by using a <div> instead for the template of components/List.vue file:
<template>
  <div v-if="items">
    <div v-for="row in items" :key="row.name">{{ row.name }}</div>
  </div>
</template>
With that, you should be able to see the list of Pokemon. Remember to change this back later once we add the Pokemon page.
Declarative Navigation
With Vue Router, you can navigate in two ways: declaratively, and programmatically. Declarative navigation is pretty much the same as what we do with the anchor tag in HTML. You just declare where you want the link to navigate to. On the other hand, programmatic navigation is done by explicitly calling Vue Router to navigate to a specific page when a user action is performed (such as a button button being clicked).
Let’s quickly break down how this works. To navigate, you need to use the router-link component. The only property this requires is :to. This is an object containing the name of the page you want to navigate to, and an optional params object for specifying the parameters you want to pass to the page. In this case, we’re passing in the name of the Pokemon:
<router-link
  :to="{ name: 'Pokemon', params: { name: row.name } }"
  class="link"
  v-for="row in items"
  :key="row.name"
>
  <div class="list-item">
    {{ row.name }}
  </div>
</router-link>
To visualize how this works, you need to know the pattern used by the Pokemon screen. Here’s what it looks like: /pokemon/:name. :name represents the param name that you passed in. For example, if the user wanted to view Pikachu, the URL would look like http://localhost:8000/pokemon/pikachu. We’ll get back to this in more detail shortly.
Continue reading
A Beginner’s Guide to Vue Router
on SitePoint.