
Others
Nuxt 3 Beta: What’s New and How to Get Started
Here’s a great article from SitePoint
In this article, we’ll explore the most notable new features and improvements offered by Nuxt 3, and we’ll also look at how most of them can be used in practice. This will provide a good overview of what’s possible with Nuxt 3 and how you can implement its goodies in your projects.
An Overview of Nuxt
Nuxt is a high-level, open-source application development framework built on top of Vue. Its aim is to speed up, simplify, and facilitate the development of Vue-based apps.
It does this by providing the following:
- Most of the best web performance optimizations are incorporated out of the box.
- Automated app scaffolding and development. Nuxt combines and integrates a curated set of best of its class tools in a form of an optimized and fine-tuned starter project.
- An opinionated set of directory structure conventions for managing pages and components more easily and efficiently.
All these goodies makes Nuxt already a perfect choice for building Vue apps. But the good news is that, after a long delay, Nuxt 3 beta version was announced in October, 2021. This completely re-architected version promises to be faster, lighter, more flexible and powerful, offering top-notch DX (Developer Experience). Nuxt is now better than ever, and it brings to the table some really impressive features. Let’s find out what they are.
What’s New in Nuxt 3 Beta
Nuxt 3 beta comes with a lot of improvements and exciting new features. Let’s explore the most notable of them.
Nitro is a new server engine build for Nuxt on top of h3. It provides the following benefits:
- API routes support. Your server API and middleware are automatically generated by reading the files in
server/api/andserver/middleware/directories respectively. You can create the desired API endpoints just by placing the corresponding files in theserver/api/directory. For example, atasks.jsfile will generate anhttp://yourwebsite.com/api/tasksendpoint. Functions inserver/middleware/load automatically and run in every request — which is much similar than how Express works. - Apps can be deployed to a variety of serverless platforms such as Vercel, Netlify, AWS, Azure, etc. Plus, some platforms (Vercel, Netlify) are automatically detected when deploying, without the need to add custom configuration.
- The built app can be deployed on any JavaScript supporting system including Node, Deno, Serverless, Workers, etc.
- Incremental Static Generation. This allows for using a hybrid mode for static plus serverless sites. The end result is a mix of SSR (server-side rendering) and SSG (static site generation). (This is a planned feature, but it’s not implemented yet.)
- Much lighter app output. The built app is put into a universal
.output/directory. The build is minified and any Node modules (except polyfills) are removed. This strategy targets modern browsers and it produces up to 75x smaller bundles, both on client and server. - Optimized cold start with dynamic server code-splitting and async-loaded chunks.
- Faster bundling and hot reloading.
Nuxi is a new Nuxt CLI. It provides a zero-dependency experience for easy scaffolding new projects and module integration.
Nuxt Kit provides a new flexible module development experience with TypeScript support and cross-version compatibility.
Nuxt Bridge allows you to use some of the Nuxt 3 features in your existing Nuxt 2 projects. Its aim is to make future migration smoother by offering to Nuxt 2 users the ability to incrementally update/upgrade their projects. Here are the Nuxt 3 features which you can include in your Nuxt 2 project, as they are stated on Nuxt’s website:
- Using Nitro server with Nuxt 2
- Using Composition API (same as Nuxt 3) with Nuxt 2
- Using new CLI and devtools with Nuxt 2
- Progressively upgrade to Nuxt 3
- Compatibility with Nuxt 2 module ecosystem
- Upgrade piece by piece (Nitro, Composition API, Nuxt Kit)
Nuxt Bridge also aims to facilitate the upgrades for the whole Nuxt ecosystem. For that reason, legacy plugins and modules will keep working, the config file from Nuxt 2 will be compatible with Nuxt 3, and some Nuxt 3 APIs (like Pages) will remain unchanged.
These were the so-called “big” features, but Nuxt 3 comes with lots more small
features and improvements. We’ll explore them in the following list:
- Vue 3 support. Nuxt 3 version is aligned with Vue 3 so you can leverage all the great features of Vue 3 such as Composition API, composables, and more. Nuxt already offers some of its functionality in a form of built-in composables like
useFetch(),useState(), anduseMeta(). For more information about the Vue 3 Composition API, see How to Create Reusable Components with the Vue 3 Composition API. - Webpack 5 and Vite support. Enjoy the latest versions of the best bundlers offering faster build times and smaller bundle size, with no configuration required. Vite, as its name suggests, offers super fast HMR (hot module replacement).
- TypeScript support with type checking, better autocompletion and error detection, and auto-generated types. If you don’t like or need TypeScript, you still can use Nuxt without it.
- Native ESM Support.
- Suspense support which allows you to fetch data in any component, before or after navigation.
- Auto-import for global utilities and composable functions. Inside a
<script setup>orsetup()function you can use any of the composable functions that Nuxt 3 offers, such asuseFetch(),useState(),useMeta(), and also Vue reactivity functions such asref(),reactive(),computed(), etc. In the newcomposables/directory you can define all your functionality in composition functions, which are auto-imported as well. This is true even for the composables from the VueUse library, after a small configuration. - Optional Pages support. Vue Router 4 is used only if you have created a
pages/directory. This can produce lighter builds if you don’t use pages. - Nuxt Devtools, which offers seamlessly integrated debugging tools right from the browser. (This is a planned feature, but it’s not implemented yet.)
Okay, now that we’ve seen how great Nuxt is in its latest implementation, let’s see how we can use its super powers in action.
In the following sections, we’ll explore how to get started with Nuxt 3 and how to use it to implement some minimal blog functionality. Particularly, we’ll examine the following:
- creating a fresh Nuxt 3 project
- adding Tailwind CSS support to the project
- creating and using custom layouts
- creating blog pages
- creating and using custom components
- using the Nuxt 3 built-in composables
- creating and using custom composables
Getting Started With Nuxt 3
Note: before we begin, please make sure you have Node v14 or v16 installed on your machine.
We’ll start by creating a fresh Nuxt 3 project. To do so, run the following command in your terminal:
npx nuxi init nuxt3-blogThis will set up a new project for you without any dependencies installed, so you need to run the following commands to navigate to the project and install the dependencies:
cd nuxt3-blog
npm install
And finally, to start the dev server, run this command:
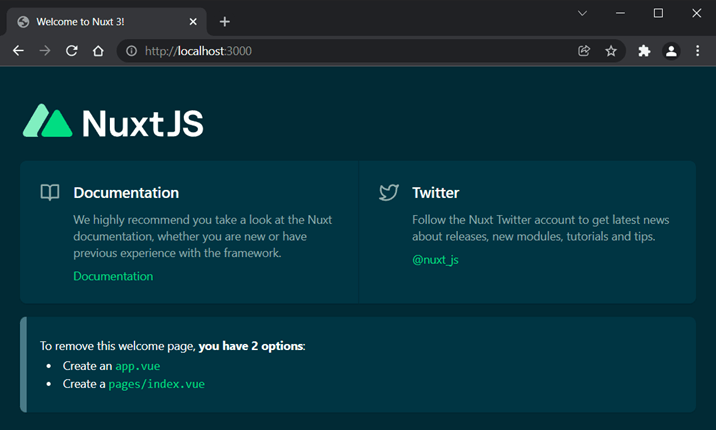
npm run devOpen http://localhost:3000 in your browser. If everything works as expected, you should see the following welcome page.
If you’re familiar with Nuxt 2, you’ll probably notice that the project structure in Nuxt 3 has been a bit simplified.
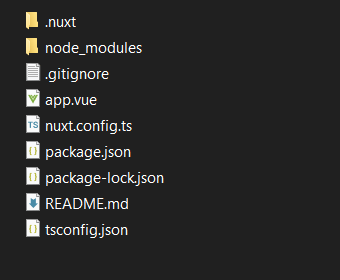
Here’s a short list exploring the most notable changes in the project structure in Nuxt 3 compared to Nuxt 2. In Nuxt 3:
- An
app.vuefile is added. It’s the main component in your application. Whatever you put in it (CSS, JS, etc.) will be globally available and included in every page. - The use of the
pages/directory is optional. You can build your app only withapp.vueas a main component and other components placed in thecomponents/folder. If that’s the case, vue-router won’t be used and the app’s build will be much lighter. - A new
composables/directory is added. Each composable added here is auto-imported so you can use it directly in your application. - A new
.output/directory is added, as we mentioned before, producing smaller bundles.
Building a Minimal Blog With Nuxt 3
Note: you can explore the complete source code for this project in the Nuxt 3 Blog Example repo.
In this section, we’ll explore the basics of Nuxt 3 by building a super minimalist blog. We’ll need a bit of styling and Tailwind CSS is a great choice for that.
Including Tailwind CSS in the project
To install Tailwind and its peer-dependencies, run the following:
npm install -D tailwindcss@latest postcss@latest autoprefixer@latestNow we need to generate Tailwind and PostCSS configuration files. Run the following:
npx tailwindcss init -pThis will generate tailwind.config.js and postcss.config.js files in the root directory. Open the first one and configure the content option to include all of your project’s files that contain Tailwind utility classes:
// tailwind.config.js
module.exports = {
  content: [
    "./components/**/*.{vue,js,ts}",
    "./layouts/**/*.vue",
    "./pages/**/*.vue",
    "./plugins/**/*.{js,ts}",
    "./app.vue",
  ],
  theme: {
    extend: {},
  },
  plugins: [],
}
Note: from version 3, Tailwind no longer uses PurgeCSS under the hood and the purge option has been renamed to content. Please read the Content Configuration section of the Tailwind docs for more information about the content option.
The postcss.config.js file doesn’t need any configuration. It already has Tailwind and Autoprefixer included as plugins:
// postcss.config.js
module.exports = {
  plugins: {
    tailwindcss: {},
    autoprefixer: {},
  },
}
The next step is to add Tailwind’s styles. Create a new assets directory and put a css folder in it. In the assets/css/ directory, create a styles.css file and put the following content in it:
/* assets/css/styles.css */
@tailwind base;
@tailwind components;
@tailwind utilities;
The final step is to update nuxt.config.ts with the following content:
// nuxt.config.ts
import { defineNuxtConfig } from 'nuxt3'

// https://v3.nuxtjs.org/docs/directory-structure/nuxt.config
export default defineNuxtConfig({
  css: ["@/assets/css/styles.css"],
  build: {
    postcss: {
      postcssOptions: require("./postcss.config.js"),
    },
  },
})
And now we can use all Tailwind’s utilities in our project.
Continue reading
Nuxt 3 Beta: What’s New and How to Get Started
on SitePoint.